Homelab - Terramaster F4-220 NAS
Years ago I purchased a Terramaster F4-220 NAS from Newegg.com when it was super-cheap. Terramaster products are usually price competitive anyway, but this was a deal too good to pass up. It’s 2GB of RAM onboard, and an Intel J1800 CPU, with 4 drive bays. I bought it, some 1TB drives, and BAM little storage NAS. After using the “TOS” or “Terramaster Operating System” that comes with the device, I was not impressed. Apparently it’s much better now, but I can’t test that, as you’ll read below. The F4-220 is simple enough to disassemble since you can also upgrade RAM as a user. I took it apart, and figured out that TOS is run from a USB thumb-drive connected by a set of USB ports on the inside of the case. Neat! There are no video outputs that I could see on the motherboard, but after some internet sleuthing I found a YouTube video of a person who purchased a 12-pin to VGA Adapter and was able to install Windows Server on the F4-220.
So after ordering the adapter, and a 32GB Samsung USB, I was off to the races. I started out with OpenSUSE and using the NAS for about 6 months before quickly outgrowing the 3TB (RAID 5 4x1TB disks). I also ended up purchasing an old HP DL380G7 Server and using that with 8x1TB SAS drives . After a few years I decided that a DL380G7 is a bit much for our household, dusted off the F4-220, and bought some 3TB HDDs.
After opening it up I discovered that “Past Me” is an asshole. I at some point lost the TOS USB, so I can’t use that anymore and I haven’t figured out how to install it to another USB flash drive, and the 32GB Samsung I had been using was repurposed for another project. Balls. So I had to go and buy a 16GB Sandisk, and away I went again. This time, however, I installed OpenMediaVault (OMV) 5.5 on it. It’s a nice OS based on Debian with a great web-based admin panel. It’s easy to administer and set up.
After installation and setting up the RAID 5 array, I installed the “USB Backup” extension so that I can automagically backup to external HDDs and take those offsite. RAID is not a backup! After that, I set up some CIFS and NFS shares and away we go! I’m not using the F4-220 as a full server so much as strictly file storage. I have 2 Dell Optiplex 390s I purchased off of eBay that run Proxmox with 2x 500GB 2.5″ HDDs in a ZFS z1 pool. Those then connect via NFS or CIFS to the F4-220 and pull/push data. It’s how I went from a single, DL380G7 to a much more energy-efficient setup.
Two problems immediately apparent are that the LEDs for the Drive Bays don’t work now, and the Fans aren’t changing speeds, either. The LEDs don’t bother me but the Fans have me worried. On one hand, they are quiet, and considering the NAS is right near where I sit in the Den, that’s nice. BUT, heat is still a thing. the HDDs were reaching High 50’s (Celsius) and that’s just not good long term. So after a few months I finally got around to fixing it.
The solution, it turns out, is pretty easy. Initially I tried the fix over at the Xpenology forums. The user “eudean” wrote a C++ app that controls the fan speed based on the HDD’s temps and that will ramp up the fan. Granted, this app was intended for Xpenology, and not OMV, but a little further down the post another use figured out how to get it to work for OMV. The second option, and the one I ended up going with, was found at Ask Ubuntu.
First, you have to install lm-sensors and fancontrol. You then need to run sensors-detect to find the fan controller. Then you have to run pwmconfig to test the fans and then create the config file.
sudo apt install lm-sensors fancontrol
sudo sensors-detect
sudo pwmconfig
Follow the prompts for sensors-detect and the defaults should be sufficient. When asked if you want to write the changes to /etc/modules, select YES. This will allow fancontrol the ability to work.
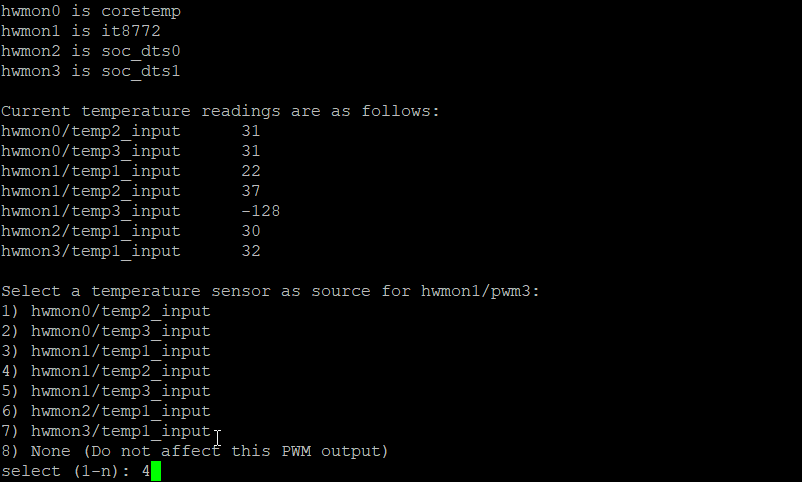
Run pwmconfig and follow the prompts. I skip the final correlation test, but if you’d feel better running it, do it.

Set up the config file.

Here, you can set the interval. You also need to setup the actual output.

Here, I chose to use the hwmon1/temp2_input because it seems like it’s the ambient case temp sensor and is most closely correlated with my HDD temps. Read each step carefully and then configure to your desired requirements. The defaults will probably be fine.
Don’t forget to save the changes before exiting.

Finally, start the fancontrol service
service fancontrol start
And that’s it! Your fans should now spin at higher rates as your device heats up. You can always run sensors to get a current reading from lm-sensors.